Saturday, 31 August 2013

The Captain Progress


One of my main problems when creating the Captain was that his head and body were more or less the same object. This made it tricky to create his head separately to his body and bake it beforehand. For the Captain the hat served in the role of the head. I spent a day or two working on it, refining it, and then finally baking it.

In reflection I think the reason I do this is that it becomes a solid 'foundation' or element to cling to as I make the rest of the character. It might sound silly, but having something solid and finished on a character that can't be changed sets a precedent for the quality of the sculpt, perhaps a goal of quality or a standard to be achieved. Structurally it's helpful too as it allows me (particularly in this instance) to push down on the solid piece lending weight and squash to the more natural elements such as the flesh of the head, neck, and shoulders.


The areas around the neck and shoulders are not as cramped as the design, but this is because I'm leaving room for the thick 'cloth' of the coat, lapels and shoulder-pads to do this. Just now I'm beginning to see that I've implicitly squashed the detail of the character towards his face, all other elements are being pushed or drawn toward it. The weight from his hat pushes down, the stretch in his coat and belly pushes up, and his little face is caught between them creating a nice focal point, and the face is where you want the focal point to be. 

Friday, 30 August 2013

The History of my Table

Before I write about my progress on the captain character, I feel I should mention the evolution of my workspace. At the beginning of commencing this project I documented it's state and thought it would be a good idea to give an update on it's evolution through working.

(Above: The old state)

(Above: The new state)

(Above: The old state)

(Above: The new state)

Aside from being more chaotic and a bit messy I notice the addition of several elements (the addition of more reference material, a piece of clean paper, and new tools). 

Another great addition is that of the 5 small posters above my work bench. Each is a 'tip', 'guiding principle', or 'guide line' that I found I was reiterating to myself subconsciously whilst I worked.
After reading Schön I knew that to pass off the opportunity to make these guide lines explicit would be a tremendous loss, so I made sure to write and expand on them as soon as I could. They have since become my primary product of my research, which is something that I never expected having spent the past couple of months slaving away at a pile of clay, and now these 5 bit of paper are my primary product!? What?!

The 5 Guidelines can be seen below:


They are: 
1) If you're unhappy with the structure of a piece; change it.
2) It's not finished, until it's finished.
3) Block out the basic structure first, don't race to the detail 
4) Always take the time to reflect on your work.
5) Don't be constrained and limited by the designs.

Each is specifically relating to my own process whilst sculpting, but I can see how they might also be used more generally in character design. 


Thursday, 15 August 2013

The Captain's Armature

With Jangles sculpted I'm now trying to figure out how I should paint him. Oddly his colouring is something I've neglected until now and this has caused a bit of a problem. I think it's the size of his pants, if I paint them a vibrant colour/pattern they will detract attention from the face, but if I make them too drab then I have a large part of my character painted in an uninteresting way.

In the meantime I've started work on what will be my second and final character for this project; the Captain. As with Jangles I wrote a short list of defining attributes and described his actions and behavior. I've decided on his name being Captain Orton Titch, because titch is old english slang for a short person and the name 'Little Tich' originated from the name of a short english comedian who bore a resemblance to Arthur Orton the Tichborne claimant (http://en.wikipedia.org/wiki/Tichborne_case).

"Orton Titch is the captain of the Mary Lou a small privateer vessel crewed by himself and four others. He identifies as a pirate, yet both he and his crew are all quite benign, preferring tricks and mischief to violence. They are the archetypical friendly pirates often associated with children's stories, tys, and films."

I've described him as being: Prone to illusions of grandeur, capricious, neurotic/irrational, lucky/fluky, a benign Napoleon, boisterous/energetic/lively, and cheeky/mischievous.

After this I then began work on his armature, I first drew up a quick map , going for the same techniques I developed through the creation of Jangles (and I was much quicker this time).

[Above]: The armature map for the Captain.

Through the lack of my usual thick armature, and a problem with 'shifting clay' that I encountered with Jangles (the clay slides along the armature instead of clinging to it) I decided to make my own thick armature wire with some light gauge wire and a power drill which I used to twist the folded wire together tightly.


This I then measured, cut to size, bent and then bound together to make the following armature.


The armature is little over 12cm tall and considerably small when compared with Jangles, yet both characters should still seem to be of the same scale. The size of this armature is quite deceptive due to the fact that his hat will be made almost entirely out of clay and carry a considerable weight.

Next I shall be bulking out the character with tin foil and beginning to build up the basic form with clay.


Tuesday, 13 August 2013

Jangles Sculpted

I've just finished baking Jangles the Clown (previously Dr. Jangles). Overall I'm quite pleased with how he turned out, there were only a few minor cracks after baking, but they sealed themselves back up once he was cooled and what remains of them will easily be covered by paint.

Above: Jangles the Clown after baking.

The trickiest part was perhaps his pants as they were quite bulky and it's difficult to get some good 'squash' and 'stretch' happening when you have so much stiff clay to shift. For his socks and stockings I made my own stamps and used them to imprint fine details. This required quite a bit of experimentation with various methods. At first I tried a basic flat stamp and tried to push it into the surface of the leg to give the impression of fishnet stockings. The clay was far too stiff at this point so the effect was fairly minor, it also resulted in the leg being distorted too much and required some fixing.
The second attempt was made using the same stamp on a flat strip of ribbon like clay which I would wind around the leg. The ribbon was too short however and needed to be stretched. I played around with a rolling-pin cross stamp method in which the stamp was cylindrical so the pattern would be continuous, but sculpting a consistent pattern onto the stamp was too difficult. In the end I just made a longer and more defined version of the first stamp (I made it's grooves and dents deeper to allow my detail) and then pressed this in a long strip of ribbon like clay which I then wound around the leg. The same process was used for the socks. I was quite impressed by the level of detail they produced and would like to develop a few similar methods for perhaps the texture of cloth and fur.

Above: Two of the stamps used. To the left is the original, to the right is the final.

I've been reading 'The Illusion of Life' lately and came across a few quotes by Walt Disney describing his attitude to the development of a character's history and personality. This has inspired me to write a few biographies for the characters that I may use in my research. The important distinction between the written descriptions and those I've written before is that I'm making no mention of a character's physical features, only their mood and personality which has shifted my thinking and attitudes toward them. I no longer see them as static artefacts, but a freeze frame of a character's life. The pose they strike in the sculpture is not their only and most defining pose, but just one of their many and it could be an insignificant and pedestrian pose (how they would stand normally as they go about their day) or a pose that defines a large aspect of their personality and story. In animation lingo, I see it as the difference between a 'key frame' and an 'in-between' frame, which is something that perhaps I will elaborate on later.

Monday, 29 July 2013

To Sculpt a Clown

I've forgotten how much I enjoy the process of sculpting a character. It can be so rewarding when everything happens just as you envisioned it. I have only just baked the head of Jangles the Clown which I have been working on over the past couple of days.

In the more recent past I find that I've rushed through characters in the hope of creating something great, quickly. The results of doing this are always personally disappointing (Wormwood in particular).

Starting with a bare armature I bulked out the characters basic form with some clay, being careful to maintain symmetry at an early stage (which means being careful with the quantity of clay, being sure that it is added in even quantities around the character). It's a slow process and the firm clay doesn't make it any easier. It took me from roughly 12am to 4pm with a few breaks (and lots of movies, James and the Giant Peach & The Witches in particular, why Roald Dahl? I have no idea) and I managed to get to this point:


It might not look impressive, but at this stage most of the laborious work takes place at this point. Moving around relatively large quantities of clay and trying maintain some symmetry isn't exactly difficult, but it is time consuming and requires a pair of enduring hands.

The next day I managed to bulk out the legs and add some shoes, which took another 2 hours.


It's at this point I realised how out of sync the perspective and foreshortening in my sketch was when compared to the sculpt. When faced with this it's better to ignore the conflict and just accept that you've made a mistake in the sketch.

Then the face, this is always my favourite part and I should really have left it until last for desert, but I think I needed to enjoy myself after two days of boring work.


At the end of the third day, at around 10:30 at night I ended up with this:


I knew it was a good start, but wrote a list of required changes like: "change ears, smooth out lips," and left it for the next day in which I finished and baked the head:


[Note]: It doesn't look anywhere near as dusty in real life, that's odd.

Thursday, 25 July 2013

Dr. Jangles' Armature

Another quick update on my progress.

I made the basic armature for the Dr. Jangles sculpt today. After going over the old armature map, I decided that a 6 piece armature was probably a bit too fragile and fiddly, so I reworked it and managed to design a much stronger 3 piece armature.

I measured out the rough lengths of each of the parts, rolled and straightened roughly 95cm of heavy gauge armature wire, marked out the measurements and bending points, and then cut them all to size.

Armature wire, being made of aluminum, is incredibly hard to solder so I usually wrap thin copper wire around the various parts of the armature that need to be bound together (in this case the spinal area).

The copper does a surprisingly good job of holding everything together, but to be safe I added a few blobs of super glue to the spinal area and waited for it to dry, then wiped off any excess glue.

When measuring I made sure to leave a bit of extra wire in the feet so that I could bend down the ends to insert into a base.

After drilling a couple of suitable holes into my 'work bench' (just a plank of MDF) I inserted the armature into the holes and made some fine posture adjustments with my hands. It's sturdy and - as far as I can tell - to the correct scale.

I'm not sure if I should give him a more dynamic pose, because I feel that it might compromise the dimensions of the sculpt and I want it to communicate his basic dimensions and shape at a glance.

This was all done in roughly an hour.

More updates to come. Progress shots below, I think I'll take more of future characters so you can see more of my process, but it's hard to stop working when you're 'in the zone'.

[Above]: The edited armature map with measurements.

[Above]: The workbench with armature.


[Above]: The armature itself.


Wednesday, 24 July 2013

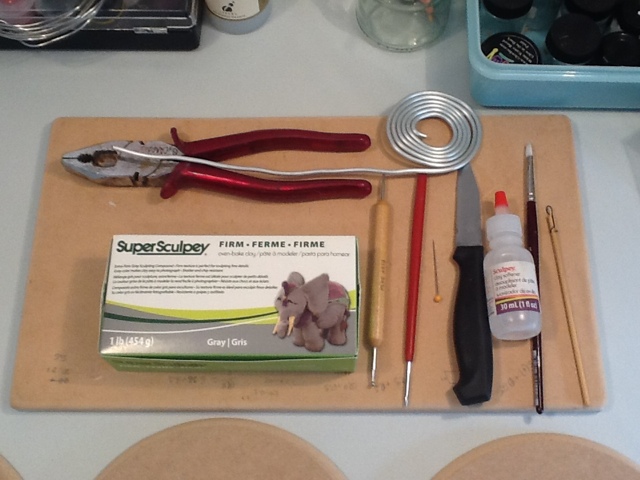
My Workspace

Just a quick post.

I thought it would be a good idea to document how my work space looks at the moment. I haven't started sculpting yet, but I've bought everything that I need and it's all set out neatly. I think I'm trying to make it as enticing as possible, but the fact that I'm still undecided on which characters I should do is causing me to procrastinate :S

I've also bought a 'creative top hat' that I'm wearing whenever I do some work, I think it's a great way of placing my mind firmly within the boundaries of "I'm wearing my work hat, therefore I must work".
It sounds like something a kindergarten teacher might use on unruly children, but so far it's working, which really makes me question my mental maturity.


Back Again

I haven't posted about anything in quite awhile and I feel that it's required of me to document what's happening both in my head and on my workbench. To be honest, not much has been happening on my work bench and I feel inclined to blame it on the fact that I've been hard pressed with written projects, but perhaps that would be just a convenient excuse.

In truth it has been a bit difficult with the pressure of a project hanging over my head and has caused me to procrastinate quite a bit more than usual, getting started is always the hardest part.

I've managed to create five ideas for potential project worthy characters and organised all of their development in neat folders (a have a habit of becoming meticulously organised whenever things get scary or a deadline is looming). The first of which is a squat pirate captain with certain swordfish like traits. The second is a fragile female mystic with a cacoon-esque turban. A grotesquely fat (and quite abstract) clown monster. A small orphaned puppet boy who is somewhat of a combination of Oliver, Pip Pirrup, and Pinocchio. And finally a strange quadrupedal clown who for whatever reason seems to have earned himself a doctorate as he is inexplicably named "Dr. Jangles".

I hope to make sculptures of all five of the characters, but I feel that this is impractical given my time constrains. When trying to get some consensus on which three characters I should definitely make I received some interesting if not varied feedback.

One of my fellow students said that "Dr. Jangles" and The Orphan seemed to be the most developed, with the Captain, Mystic, and Monster all being far too abstract or more "ideas of what they are" rather than being a fully realised character. My supervisor on the other hand seemed to revel in the conceptual nature of particularly the mystic.

Personally I imagine that "Dr. Jangles" would be the most fun to sculpt and I'm quite keen to do him justice. The Monster is quite interesting conceptually, but I imagine she would be quite difficult to get right. At this time I'm inclined to choose, "Dr. Jangles", The Captain, and The Mystic, as they each have quite interesting shapes that I believe will push me into strange challenges that I've never really experienced before.

Also, just briefly, my supervisor made a great point of asking me to think about how each character would move and act. This was something that had been resting in the back of my head, but had never properly addressed. So I am now in the process of drawing rough walk cycles, playing loosely with plasticine and using whatever I can get my hands on to simulate the correct feeling for each character's movement (at one particularly creative stage I filled an old plastic bag with rags and mandarines and shuffled in across the kitchen bench, the results of which I might post here).

That's all for now, I'll post some of the developmental work for each character here when I figure out how to do so.

[Above]: Dr. Jangles final design sketch.

[Above]: Ms. Magwitch sketches, the first was done almost a year ago when I woke up in the middle of the night.

[Above]: Rough colour concepts for Ms. Magwitch, done with just a mouse because my tablet was faulty.

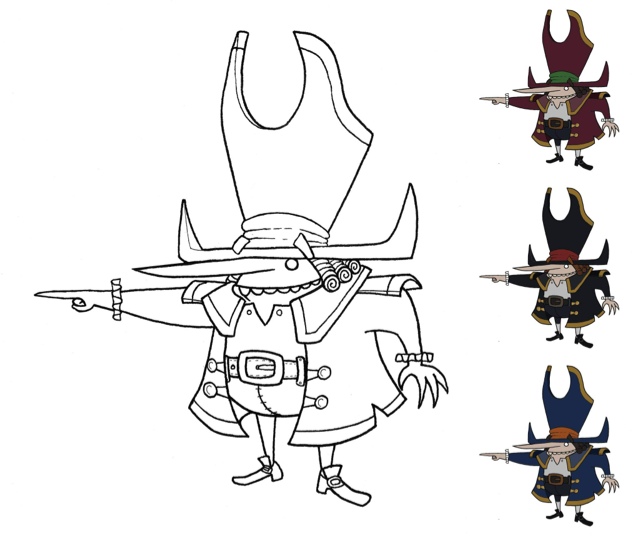
[Above]: The Captain turnaround.

[Above]: The Captain with some possible colour combinations, I'm starting to think of him as having an abnormal skin tone like green or blue.

[Above]: Ms. Magwitch taking her first terrifying steps.


[Above]: An early conceptual sketch of The Mystic

[Above]: Thinking of how the Mystic would move about, a bit of a laboured slug-like shuffle.

[Above]: Early sketches of the Orphan; Goghrey Vandewilde. He came from a noble family, hence the ponsy name.


[Above]: Goghrey's Orphan Regalia

[Above]: Costume choices.

[Above]: Thinking about movement.


Wednesday, 13 March 2013

Wormwood Head Sculpt

Taking advantage of the cool weather; I decided to get to work on the characters for my "Wormwood" scene. Sorry about the poor camera quality, but it was taken with my iPad.


I'm quite happy with how it came out, and I'm glad that it looks as much like the concept sketch as it does, which rarely happens. Planning and conception really do help.

I'll start on the body in the next day or so as I'm hard pressed to complete this and my uni work before the 18th :S

Monday, 11 March 2013

"Wormwood" Progress

It has been a horrendously hot nine days here and I've been trying desperately (with the aid of a summer, or more accurately, autumnal cold) to finish a scene piece in time for the Red Hill Art Show.

Here it is thus far:
Sorry about the poor picture quality, I'll take some proper pictures once it's done, with a proper camera and a proper photographer.

The piece is called "Wormwood" and is a reference to The Absinthe Drinker by Viktor Oliva (not to be confused by Manet painting of the same name). There will be two characters present in the piece; Wormwood the Green Fairy and The Barfly. Below are some quick sketches of them:


It's coming along nicely, but I'm fast running out of time, especially since I've started my honours degree and I have yet to make the two characters that will be populating it. I'm not sure how I'm going to be able to make two characters in two weeks, but I'm sure I can manage it.

On the bright side however; one of the event organizers paid a quick visit to my website and has now asked me to run a two day workshop of the children of the local school. Which I'm thrilled at, but also fills me with dread when I think that I may not finish this piece in time for the show.

There are some in progress shots and documentation on my Facebook page which can be found here.

Sunday, 10 March 2013

Greetings & Whatnot

Salutations to you one and all for finding my most secretive of secrets; my blog. An unpleasant sounding word, and one that I'm almost entirely unfamiliar with. However, I intend to use this new fan-dangled techno-wizardry to catalog my devious exploits, creative work, and research so that you might better understand both my practice and the practice of others.